Counter-Strike 2: Price Tracker
A self-hosted web application that can track and report the prices of cosmetic items in Counter-Strike 2 via Discord alerts.
My Goal:
For this project, I had two main goals:- Find an open-source repository on GitHub and containerize it with Docker.
- Deploy and host the application securely on my home network
Self-hosting an internet-accessible application on a personal home network comes with its risks, and it is therefore important to minimize the attack surface of the network and its devices.
The Network Layout
I'll start with the layout of the network. A virtualized OPNSense instance sits behind my physical home router and in front of our internal networks. All of the devices behind the OPNSense router as well as the router itself are VirtualBox VMs running on my home PC. Here is a diagram that illustrates this:
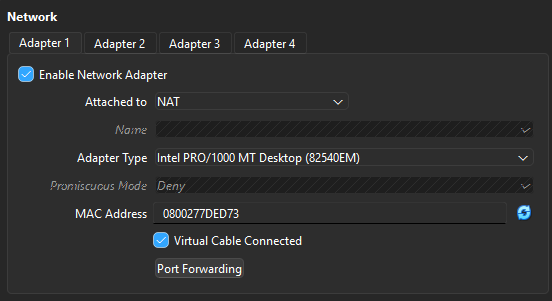
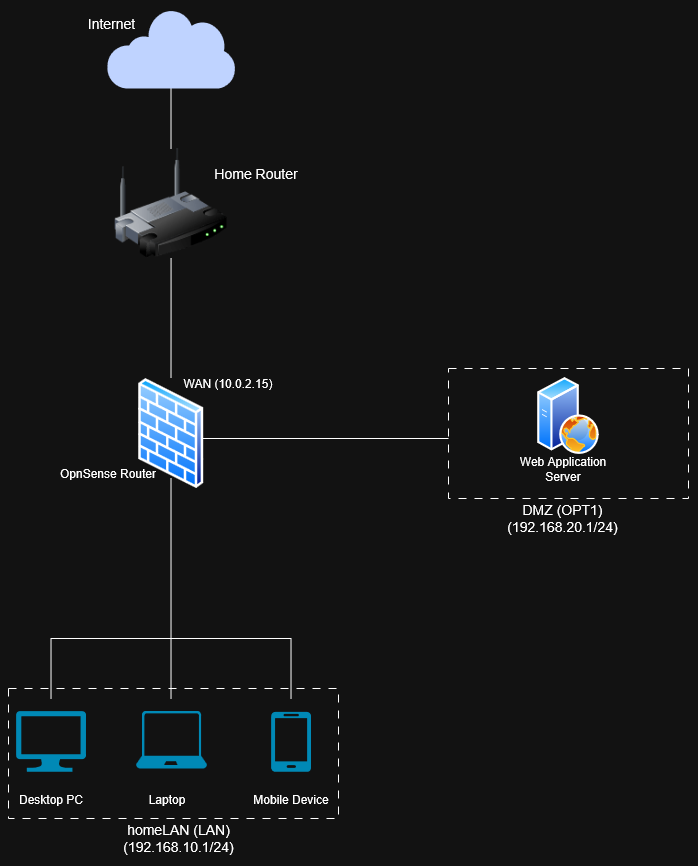 The OPNSense router has three interfaces: WAN (public), LAN (private), and OPT1 (DMZ). The VM running our web application will live
in the DMZ subnet. Our other home devices will be in our LAN subnet, including the admin web GUI for OPNSense and a dedicated admin machine
for our web application server. Connections to and from external devices are handled by the WAN interface.
The OPNSense router has three interfaces: WAN (public), LAN (private), and OPT1 (DMZ). The VM running our web application will live
in the DMZ subnet. Our other home devices will be in our LAN subnet, including the admin web GUI for OPNSense and a dedicated admin machine
for our web application server. Connections to and from external devices are handled by the WAN interface.
Setting up the VMs:
OPNSense Router
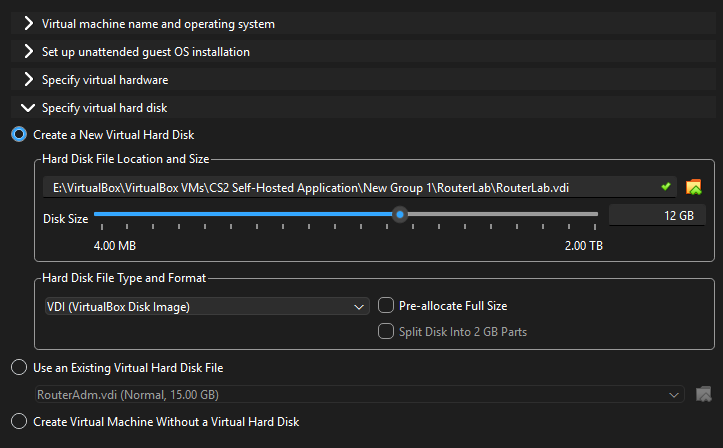
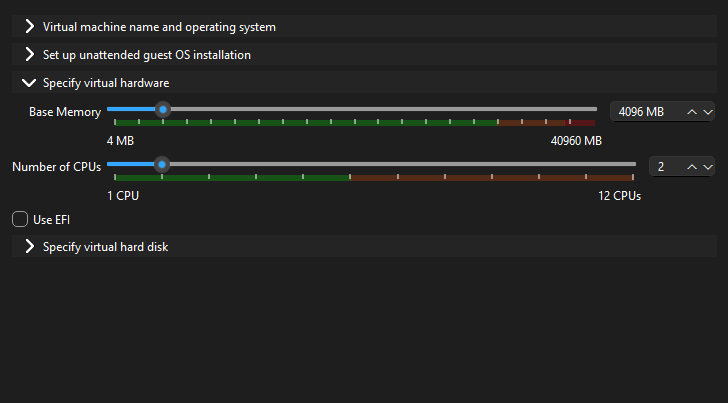
First, I downloaded the OPNSense ISO from the OPNSense official websiteand created a new VM for it in VirtualBox: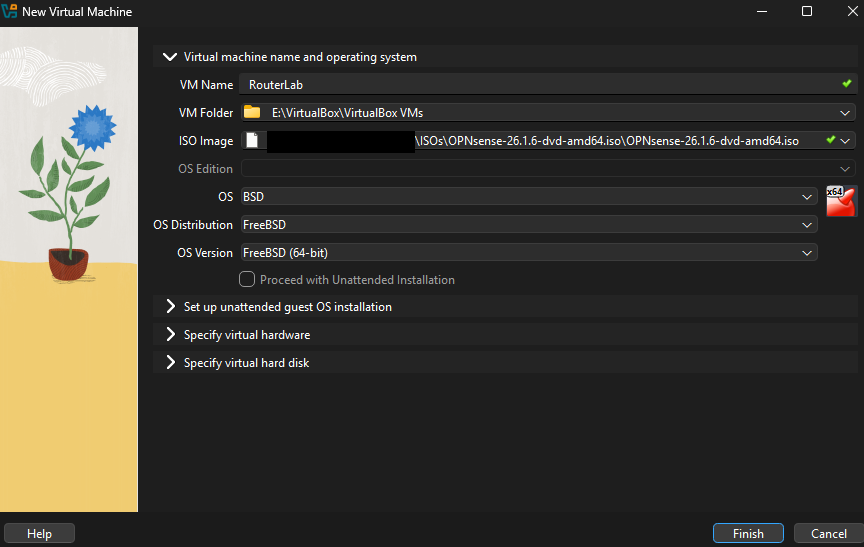 In terms of system resources we'll allocate 4 GB of RAM, 2 CPUs, and 12 GB of storage.
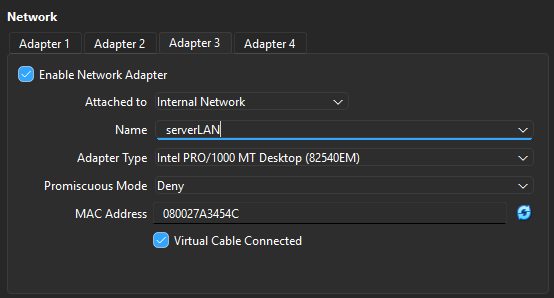
- NAT
- homeLAN
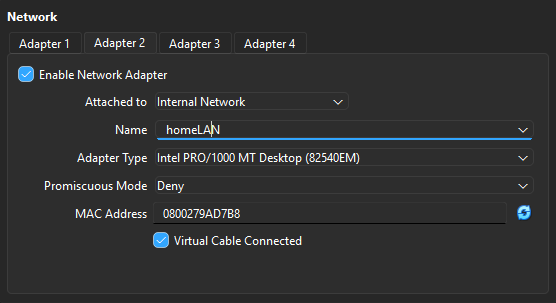
- serverLAN

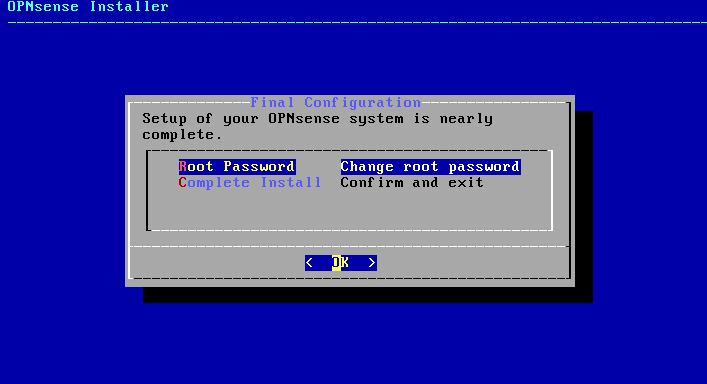
I'll enter the login info to start the installation and select the default options (default keymap, ZFS, Stripe - No Redundancy). Before exiting the installation screen I'll change root password from its default and power down the VM.
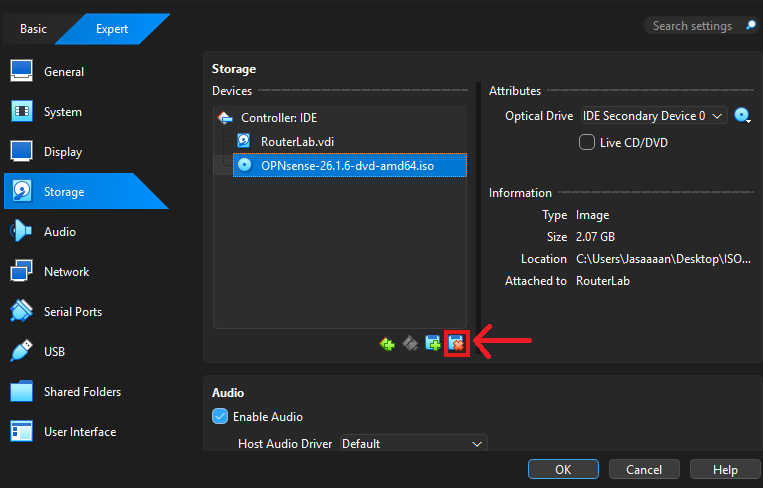
 After that we'll need to eject the installation ISO from the "RouterLab" VM.
 Start the virtual machine back up. We can now log in to the console using our new password we set earlier. I'll assign interfaces for the three adapters I created
in VirtualBox earlier.
Start the virtual machine back up. We can now log in to the console using our new password we set earlier. I'll assign interfaces for the three adapters I created
in VirtualBox earlier.
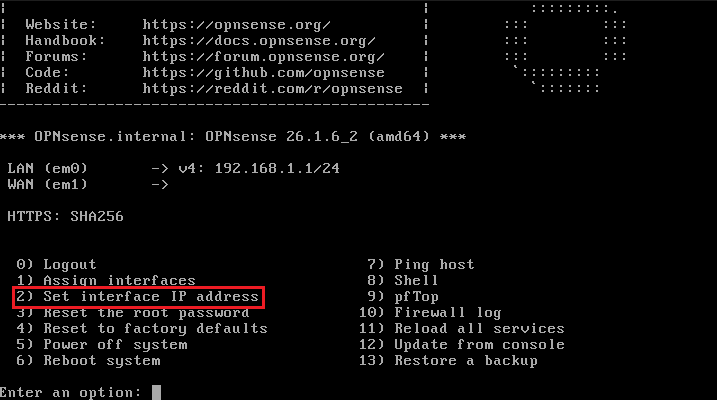
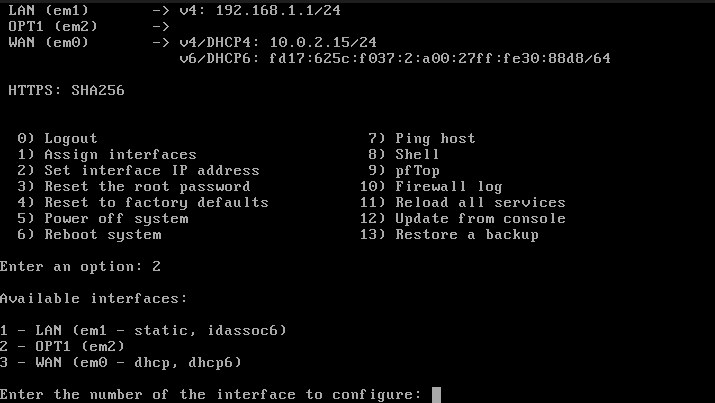
Network Interface Configuration:
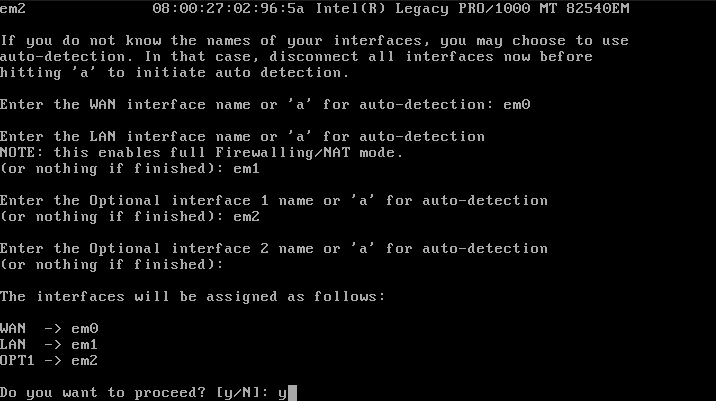
After entering option 1 into the console(and skipping options to configure LAGGs/VLANs) OPNSense should show three valid interfaces that we can map.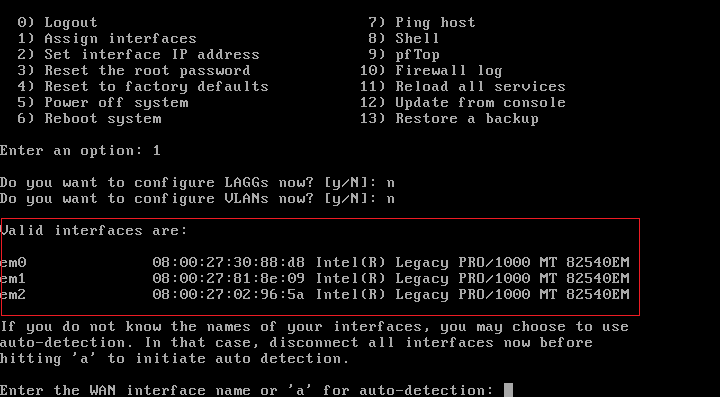 These interfaces correspond with the three adapters (NAT, homeLAN, serverLAN) we created before the initial OPNSense OS installation. A series of prompts will appear asking for the WAN,
LAN, and OPT1 interface names, in that order. The interface names, in order, are: em0, em1, and em2.
These interfaces correspond with the three adapters (NAT, homeLAN, serverLAN) we created before the initial OPNSense OS installation. A series of prompts will appear asking for the WAN,
LAN, and OPT1 interface names, in that order. The interface names, in order, are: em0, em1, and em2.
 Next I'll configure IP addressing for the LAN and OPT1 interface (option 2).
 Starting with the LAN interface, I'll set manually set an IP address instead of assigning it via DHCP. Following the network layout diagram at the top of the page, the IP address of our
LAN interface should be: 192.164.10.1/24
Starting with the LAN interface, I'll set manually set an IP address instead of assigning it via DHCP. Following the network layout diagram at the top of the page, the IP address of our
LAN interface should be: 192.164.10.1/24
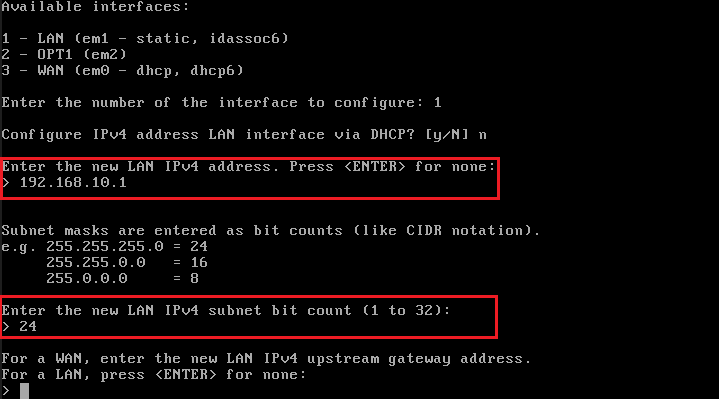 We do not need to enter an IPv4 upstream gateway address so we'll leave that option blank and hit enter. I won't be using IPv6 so those options will be left blank as well.
I'll enable the DHCP server on this interface when prompted and enter the IPv4 client address range:
We do not need to enter an IPv4 upstream gateway address so we'll leave that option blank and hit enter. I won't be using IPv6 so those options will be left blank as well.
I'll enable the DHCP server on this interface when prompted and enter the IPv4 client address range:
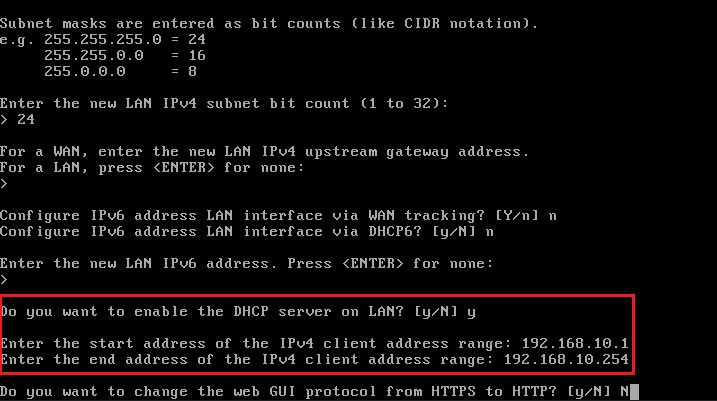 A message pops up notifying us that we can now access the web GUI administrator panel!
 The OPT1 network interface will be assigned 192.168.20.1/24, DHCP server enabled, have an address range of 192.168.20.1-192.168.20.254, and no IPv6 addressing,
same as when we configured our LAN interface.
The OPT1 network interface will be assigned 192.168.20.1/24, DHCP server enabled, have an address range of 192.168.20.1-192.168.20.254, and no IPv6 addressing,
same as when we configured our LAN interface.
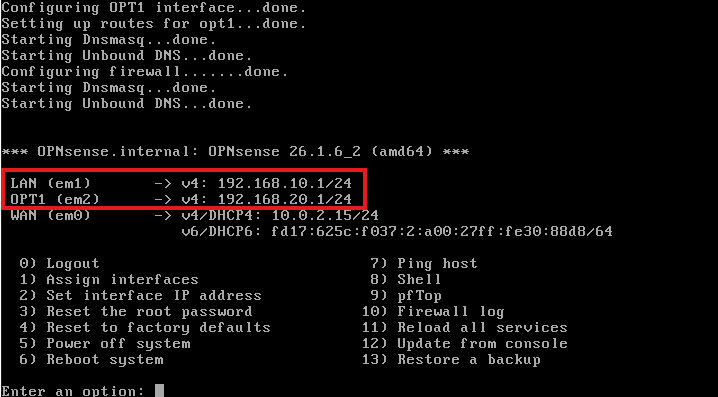 In the image above we can see that our interfaces have been configured correctly.
OPNSense Web GUI
Next I will set up a dedicated virtual machine that will have access to my router's web GUI panel. I'll create a home PC virtual machine in VirtualBox and install Lubuntu on it as the operating system. I chose Lubuntu because of its lightweight desktop experience and small disk space requirements compared to Ubuntu Desktop. This workstation will be our dedicated machine for accessing the OPNSense web GUI administrator tool and have a minimal installation of Lubuntu.
This VM (plus other devices on our home network) will only use the "homeLAN" adapter.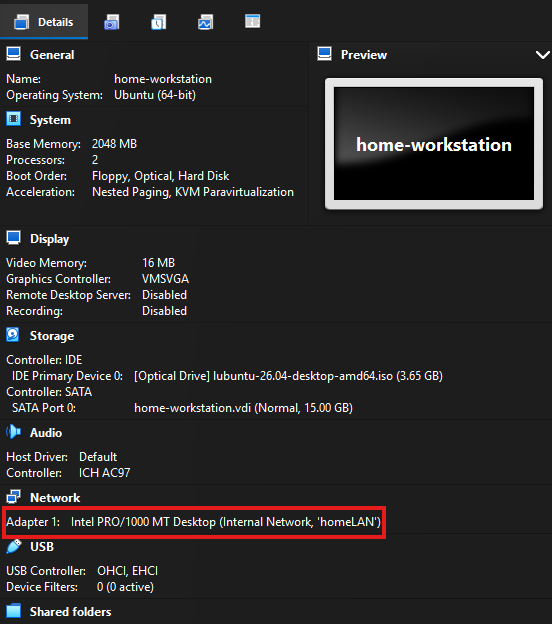
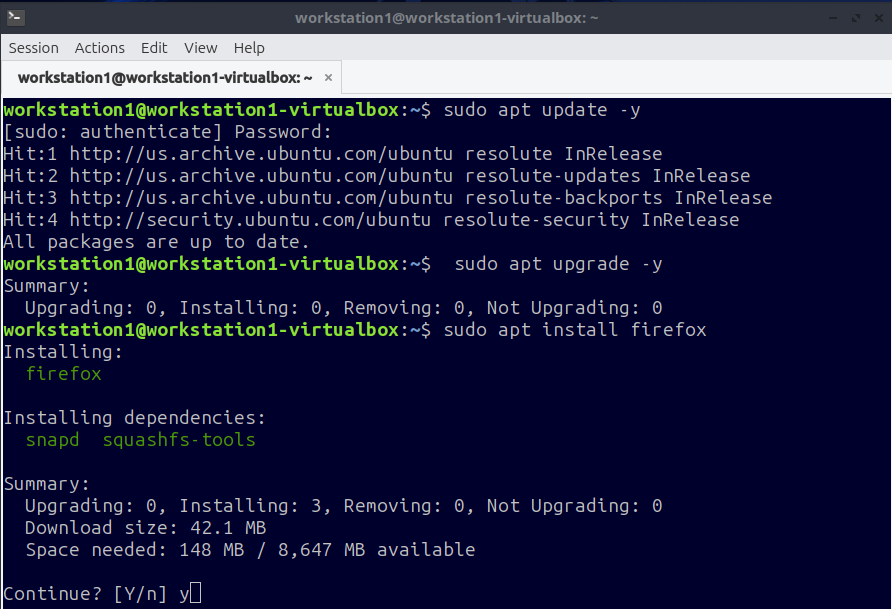
I chose to do a minimal install of Lubuntu on this VM, so I'll need to download a web browser after I do security and package updates.
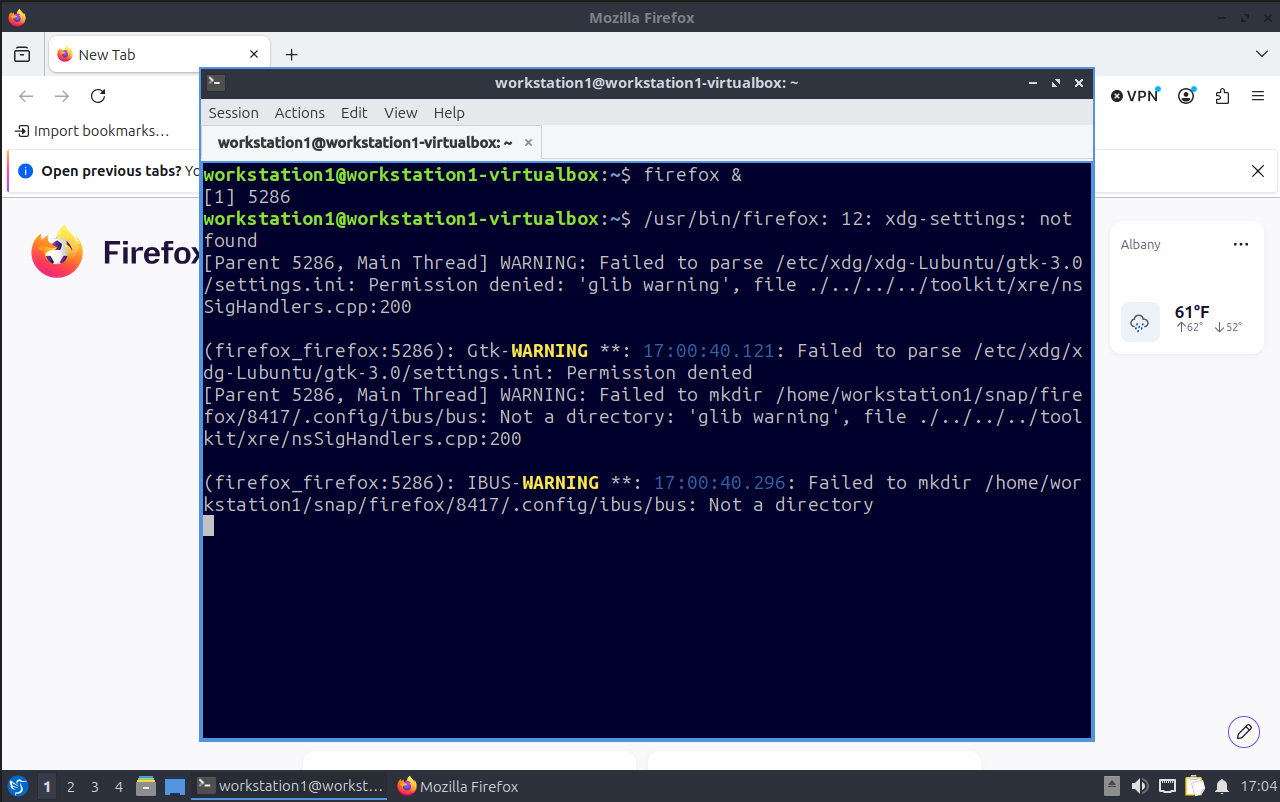
 Once Firefox is installed, we can open the web browser in the terminal with "firefox &".
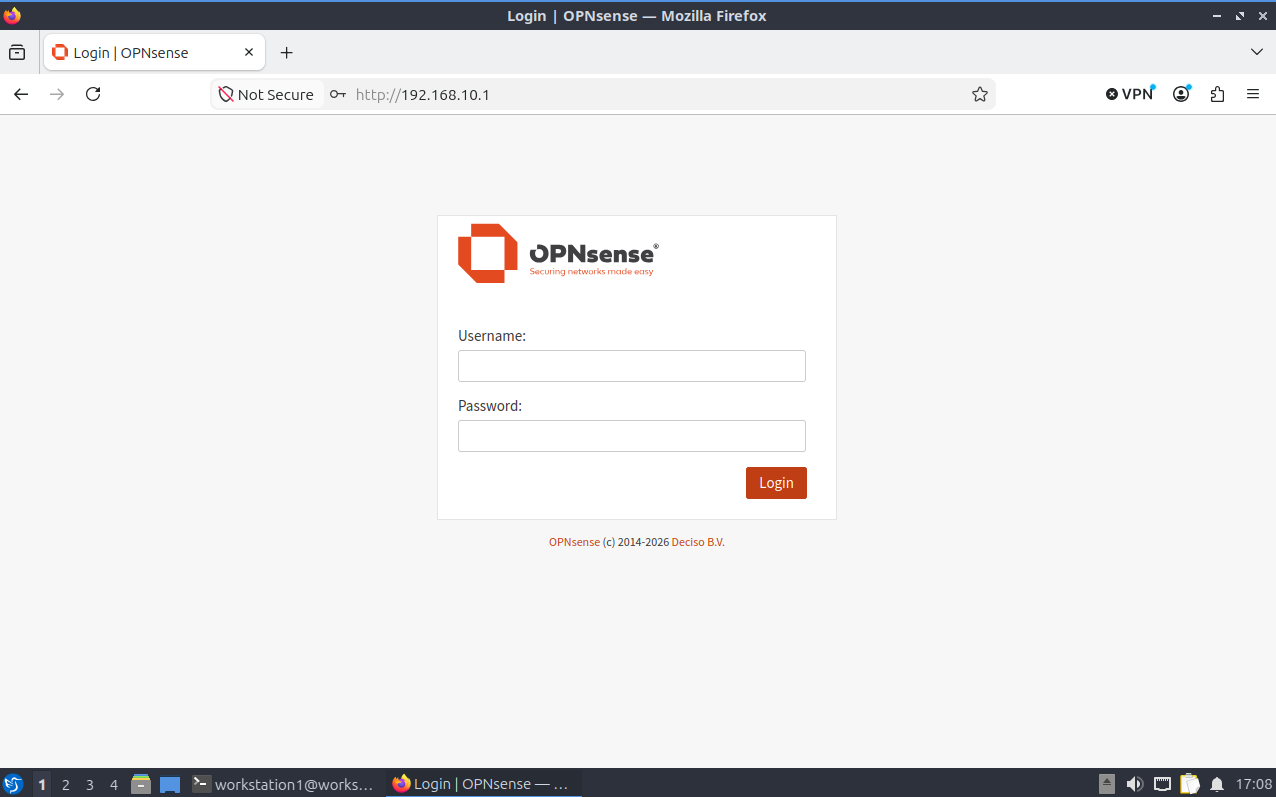
 Now we can reach the login page for the OPNSense web GUI if we type in the IP address we assigned to our LAN interface.
OPNSense Firewall Configuration
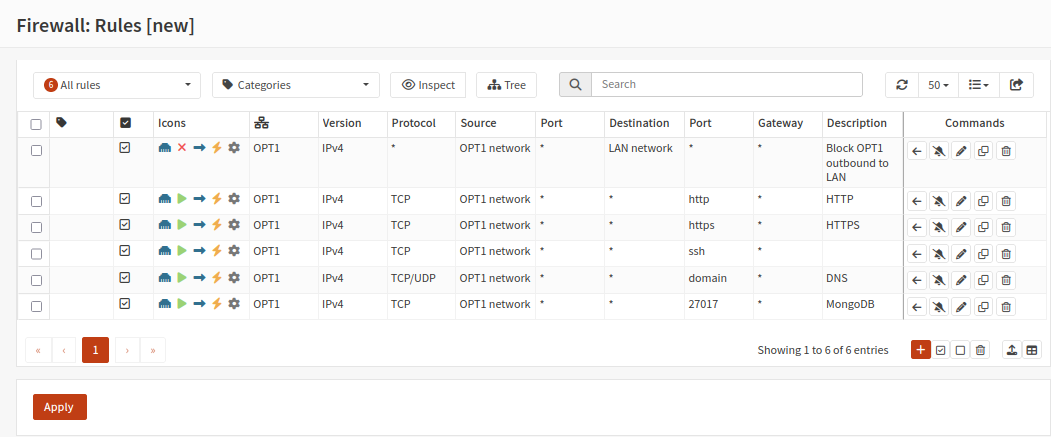
In the web GUI, navigate to "Firewall" → "Rules [new]"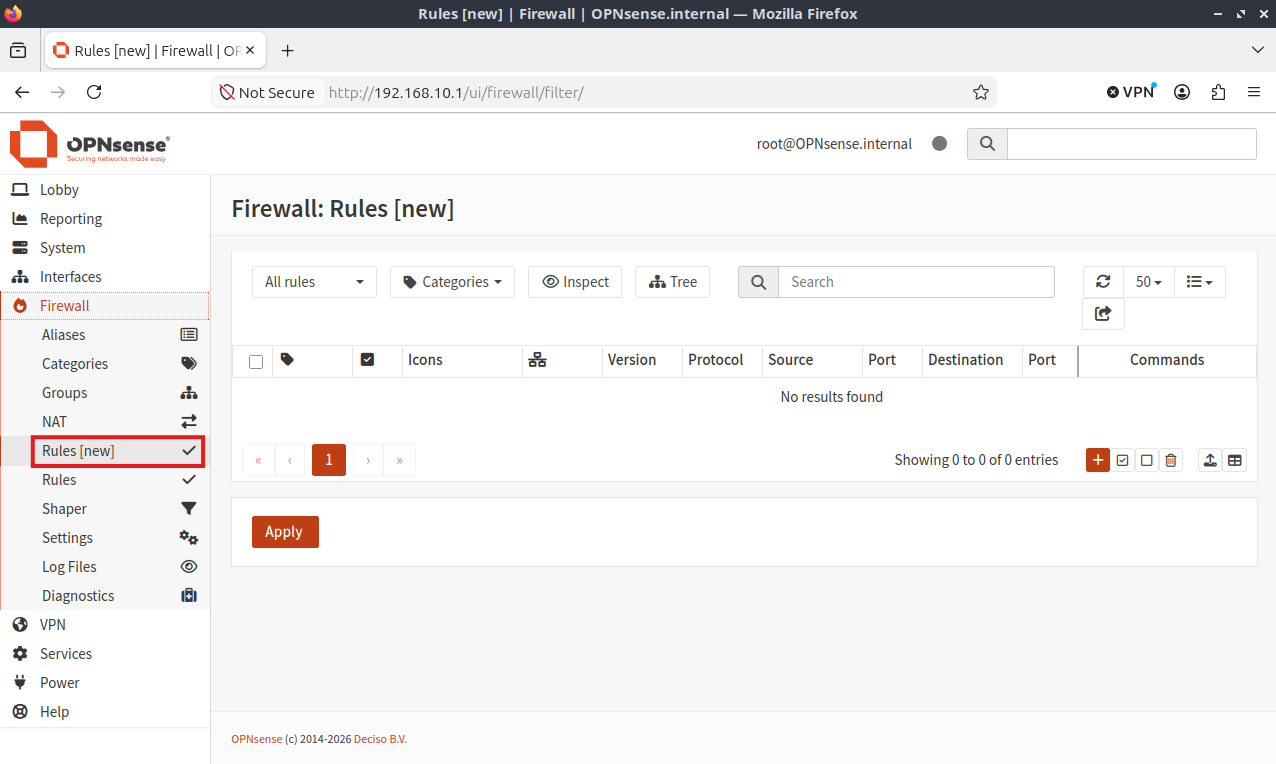
Firewall Rules:
OPT1 Interface
| Source | Destination | Protocol | Port | Action | Description |
|---|---|---|---|---|---|
| OPT1 Network | LAN Network | any | any | block | Block OPT1 outbound to LAN connections |
| OPT1 Network | any | TCP | 80, 443 | Allow | http, https |
| OPT1 Network | any | TCP | 22 | Allow | SSH |
| OPT1 Network | any | TCP/UDP | 53 | Allow | DNS |
| OPT1 Network | any | TCP | 27017 | Allow | MongoDB |
This is what the firewall rules in the table shown above look like in the OPNSense web GUI:
After applying/saving our new rules, the firewall will now allow devices in our OPT1 network to be accessed from the internet.
Finally, the last thing I need to do is navigate to "Services" → "Dnsmasq DNS & DHCP" → "General" and add our OPT1 interface.
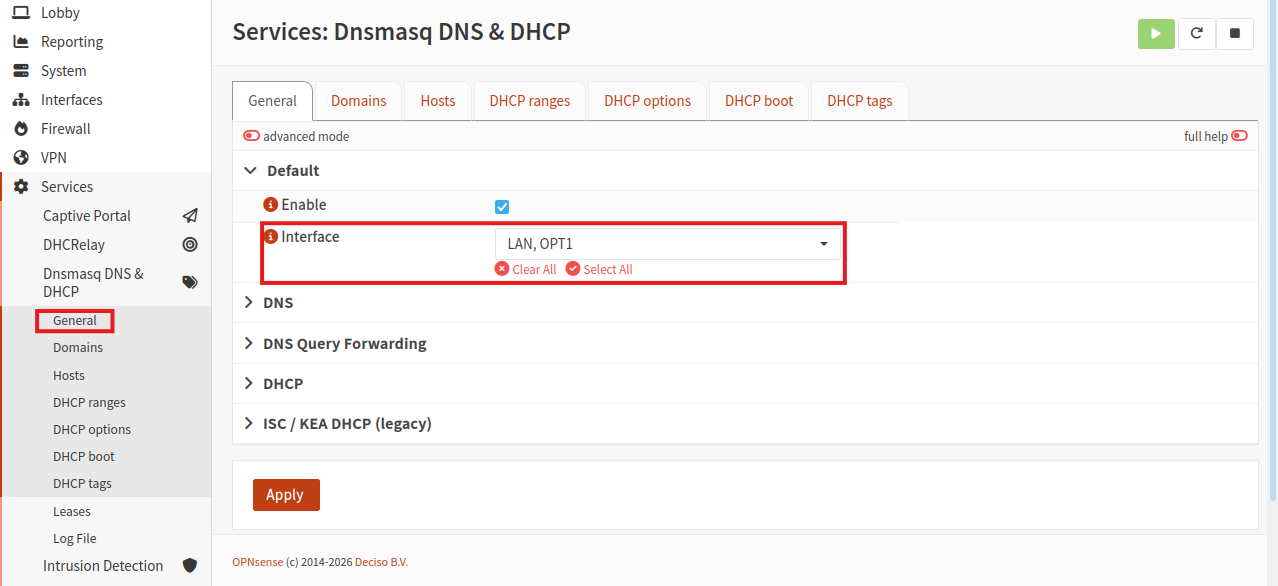
Now the firewall will allow devices within our OPT1 network to access the internet as well as other necessary services for the web application (MongoDB, GitHub SSH, DNS), but will block OPT1 devices from communicating with devices in the LAN network.
Web Application VM
Once again we'll create a new virtual machine in VirtualBox. This VM will host our web server and run our Docker containers. For the OS I'll be installing Ubuntu Server. Official Download Link
This virtual machine will be using our serverLAN adapter (OPT1 in OPNSense), which can now access the internet after configuring the OPNSense firewall.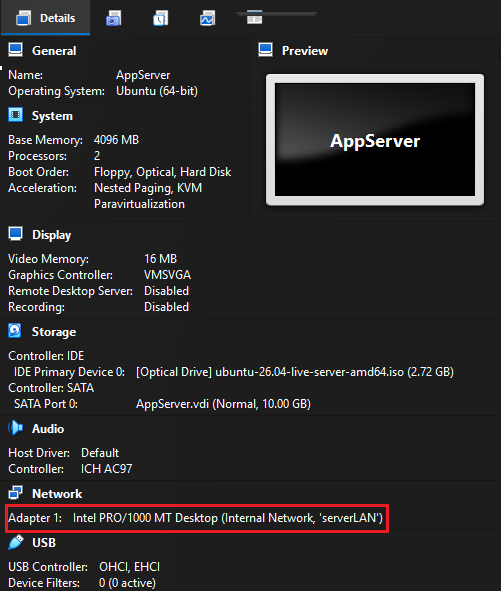
Immediately after the standard installation is complete, I can check that this VM is in the OPT1 network with the command "ip a".

After performing the necessary security/package updates, I'll install Git and Docker.
While Git has no issues installing on my Ubuntu Server, attempting to install Docker will output this error: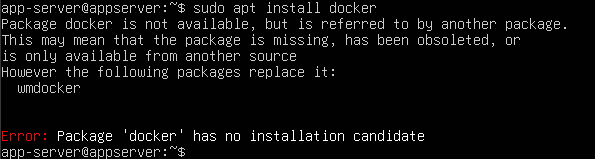 This is just because I need to set up the Docker apt repository if I want to install it using this package manager. Documentation on Docker's website provide
instructions as well as specific commands to install Docker using the apt repository: Link to Docs
This is just because I need to set up the Docker apt repository if I want to install it using this package manager. Documentation on Docker's website provide
instructions as well as specific commands to install Docker using the apt repository: Link to Docs
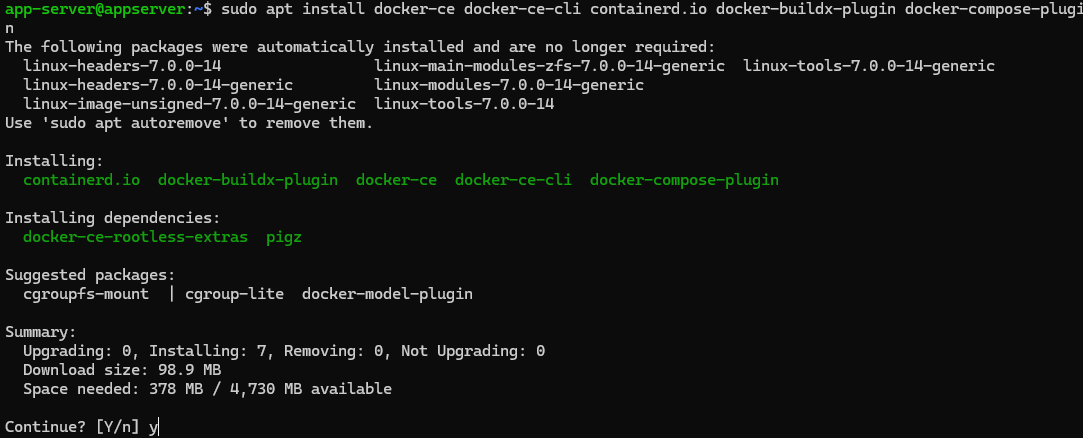
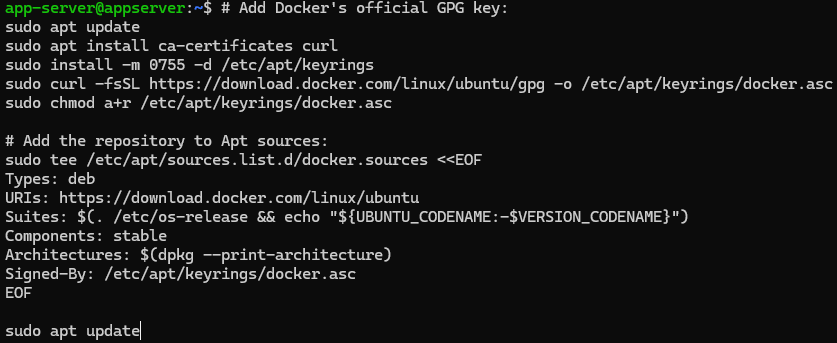 Now we can install Docker packages using the apt package manager
 Verify that the Docker service is running:
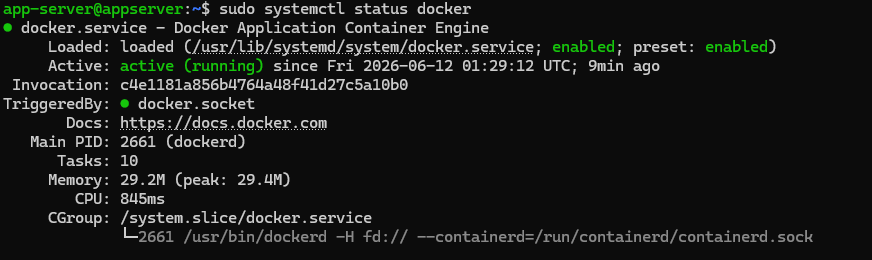
The virtual environment is now complete! The server can now pull the application source code from GitHub, containerize its services, and run them.
Application Setup
With our virtual network and computing environment set up, it's time to get the application up and running. From this point on I'll be doing everything in an SSH session from the host machine (my home PC).
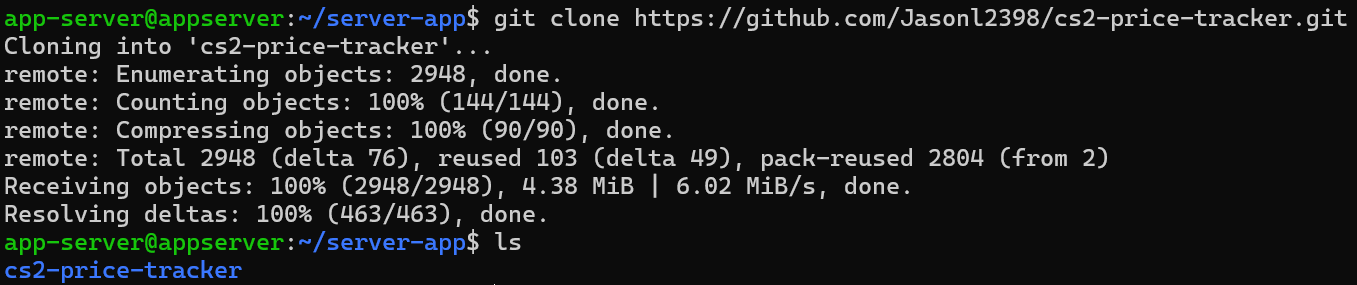
First, I'll make a new directory for the application source code: Then I'll clone a fork of the GitHub repository on my account:
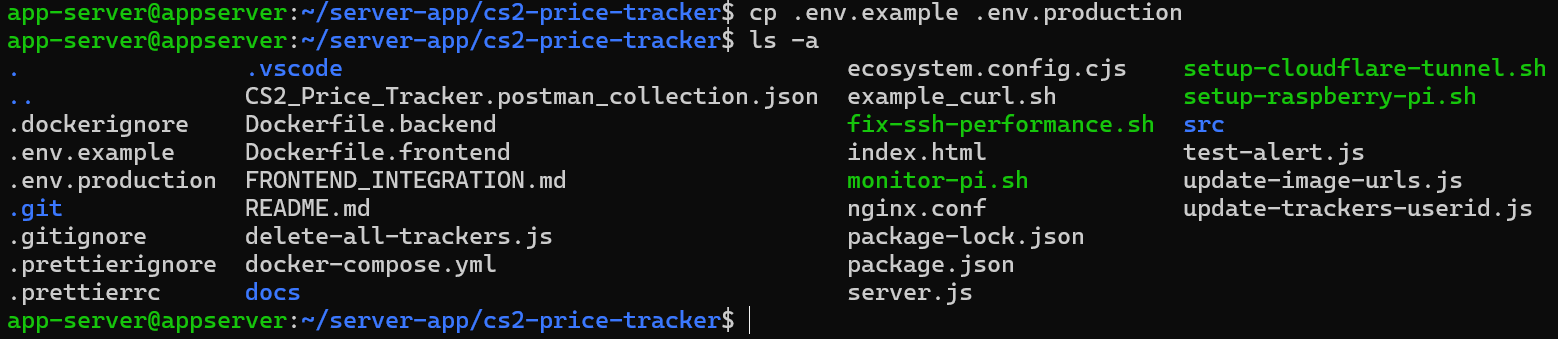
There are some files that need to be created and/or edited that the application requires, the first one being the .env file.
The repository comes with a template .env file included: I'll copy the contents of .env.example into a new .env.production file and edit the file using nano:
 Edit these lines in .env.production:
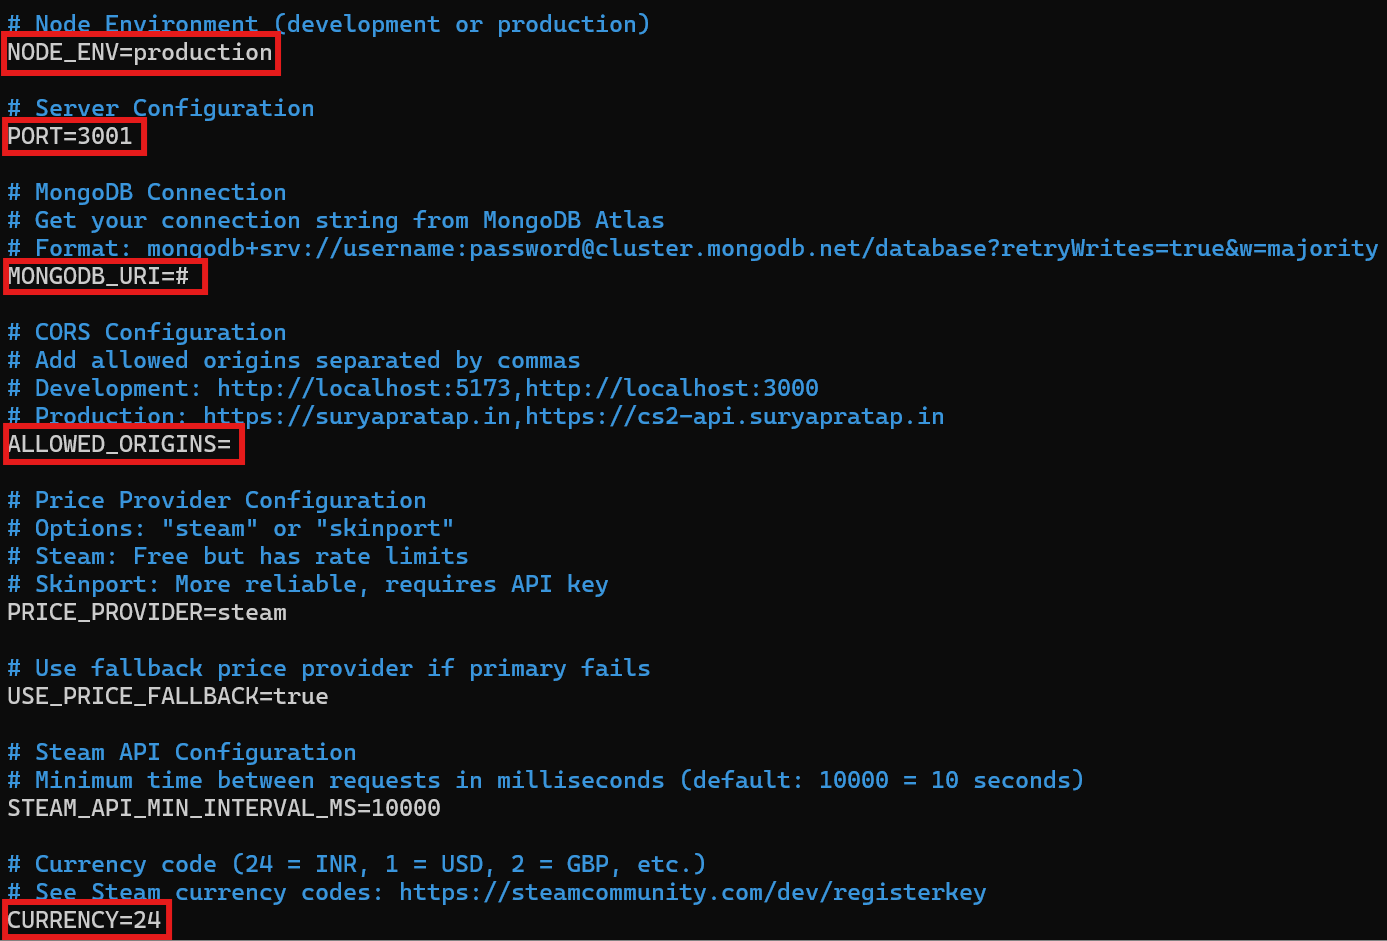 To this:

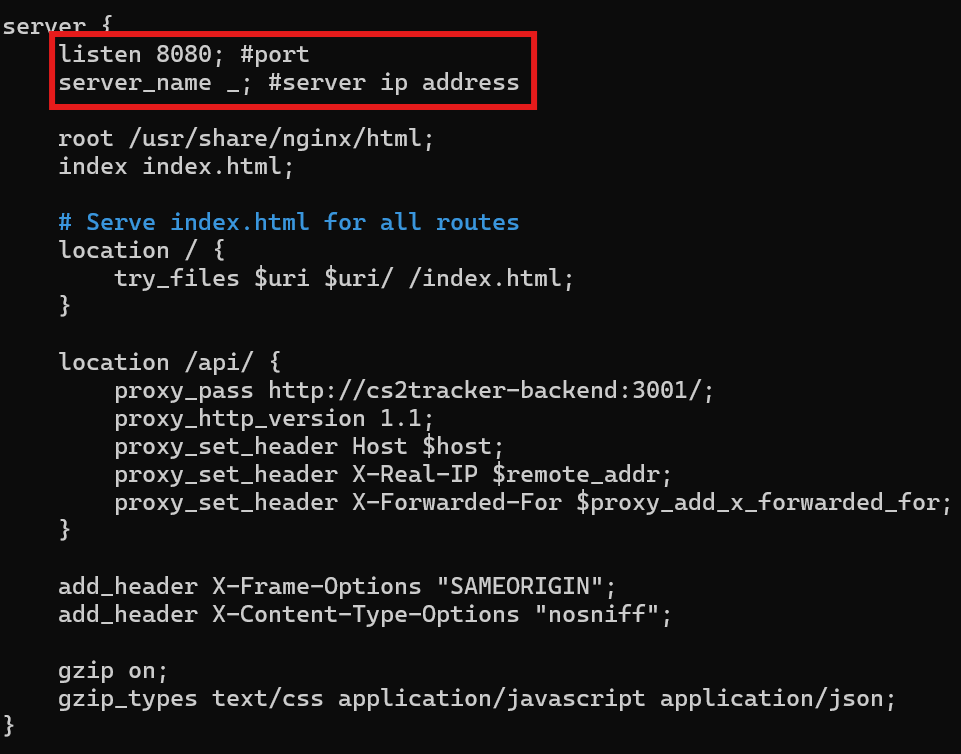 For "server_name" I'll change it to the ip address of the application server VM and leave it listening on port 8080. Now I just
need to install Node Package Manager ("sudo apt install npm") and set up a free-tier MongoDB Atlas instance.
For "server_name" I'll change it to the ip address of the application server VM and leave it listening on port 8080. Now I just
need to install Node Package Manager ("sudo apt install npm") and set up a free-tier MongoDB Atlas instance.
MongoDB Atlas
Our open-source application was designed to use MongoDB as its database. By signging up on their website I can create a free MongoDB Atlas cluster. Immediately after creating a new cluster I'll create a new database user:
 MongoDB generates a random password for this new user that I'll store in a secure location. This password is also what replaces the "<db_password>" placeholder
in my MongoDB connection string.
MongoDB generates a random password for this new user that I'll store in a secure location. This password is also what replaces the "<db_password>" placeholder
in my MongoDB connection string.
Docker Containers
Now for the next main objective in this project: learn how to containerize applications with Docker. I'm going to have the frontend and backend run in their own separate containers. To do this, I'll create two Dockerfiles and a docker-compose.yml file.
Dockerfile.frontend
            FROM nginx:alpine

            # Remove default nginx html and copy our index.html
            RUN rm /usr/share/nginx/html/*
            COPY index.html /usr/share/nginx/html/index.html

            # Copy our nginx.conf
            COPY nginx.conf /etc/nginx/conf.d/default.conf

            # Front-end listens on example port 80
            EXPOSE 80
Dockerfile.backend
            # BUILD
            FROM node:20-alpine AS builder
            WORKDIR /app

            COPY package*.json ./
            RUN npm ci
            #RUN npm ci --omit=dev

            # RUNTIME
            FROM node:20-alpine

            # tini for parent process (PID 1)
            RUN apk add --no-cache tini wget curl

            WORKDIR /app

            COPY --from=builder /app/node_modules ./node_modules

            COPY package.json ./
            COPY server.js ./
            COPY src/ ./src/

            # Non-root user for security
            RUN addgroup -S appgroup && adduser -S appuser -G appgroup
            USER appuser

            # Back-end listens on example port 8081
            EXPOSE 8081

            ENTRYPOINT ["/sbin/tini", "--"]
            # cmd ["npm","run","dev"]
            CMD ["npm", "start"]
docker-compose.yml
            services:

            backend:
                build:
                context: .
                dockerfile: Dockerfile.backend
                container_name: cs2tracker-backend
                restart: unless-stopped
                env_file:
                - .env.production
                environment:
                NODE_ENV: production
                ports:
                - "8081:8081"
                networks:
                - cs2tracker-net
                healthcheck:
                test: ["CMD", "wget", "-qO-", "http://localhost:3001/user/04408607-505d-42bc-a9b9-db2ec518a3bb"]
                interval: 30s
                timeout: 5s
                retries: 3
                start_period: 15s

            frontend:
                build:
                context: .
                dockerfile: Dockerfile.frontend
                container_name: cs2tracker-frontend
                restart: unless-stopped
                ports:
                - "8080:8080"
                depends_on:
                backend:
                    condition: service_healthy
                networks:
                - cs2tracker-net

            networks:
            cs2tracker-net:
                driver: bridge
 Now we'll start our Docker images with the command "docker compose up --build -d"
 The terminal will print a message telling us that the containers have successfully started and that our health checks have passed.

Now that the services have been containerized and are able to run on my VM, I should check to ensure that the web application is reachable.
From our Ubuntu Server terminal, it should respond with our front-end's .html file: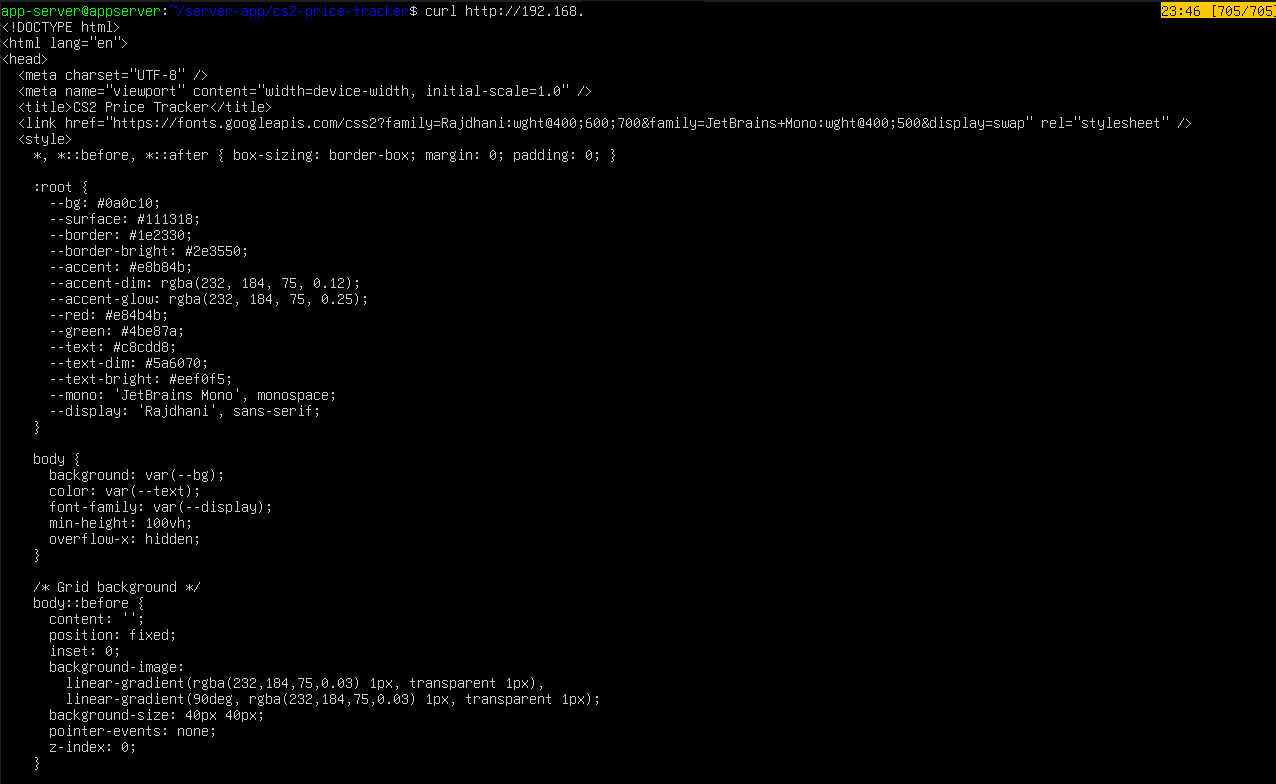 I can also test connectivity in a web browser on my admin virtual machine, since OPNSense's firewall only blocks traffic outbound from the server
network (serverLAN) to the home nework (homeLAN), not the other way around.
I can also test connectivity in a web browser on my admin virtual machine, since OPNSense's firewall only blocks traffic outbound from the server
network (serverLAN) to the home nework (homeLAN), not the other way around.
 I've confirmed that the application is running properly and is reachable from another device, which also verifies that our OPNSense firewall rules are functioning. The next step is to make our application
accessible from the internet.
I've confirmed that the application is running properly and is reachable from another device, which also verifies that our OPNSense firewall rules are functioning. The next step is to make our application
accessible from the internet.
Port Forwarding
In order to make the application accessible from the internet, I need to set up some port forwarding rules. I'll start with my physical home router by accessing its web GUI admin panel on my home machine and creating a new port forwarding rule. On my router, it looks like the image below. It conveniently lists the devices that are on my home network for me, with the one we're looking for at the bottom.
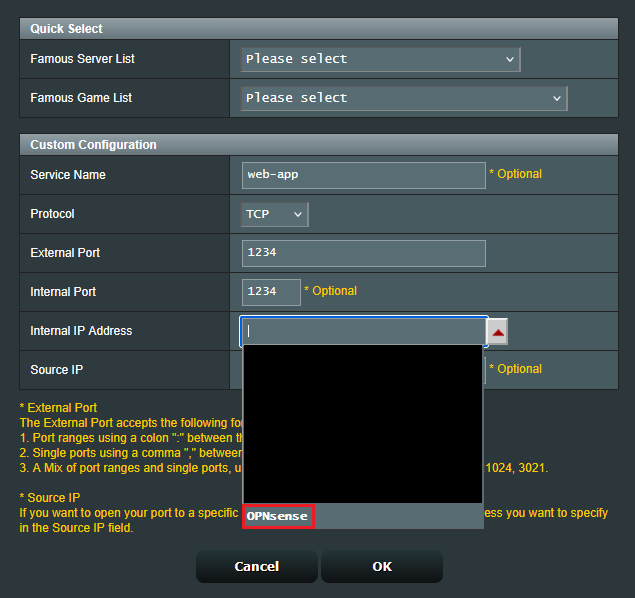 Now my router will forward inbound traffic from a port of our choosing to the OPNSense router. I'll need to create destination NAT (DNAT) rule in OPNSense to continue forwarding that traffic to our web server
VM.
Now my router will forward inbound traffic from a port of our choosing to the OPNSense router. I'll need to create destination NAT (DNAT) rule in OPNSense to continue forwarding that traffic to our web server
VM.
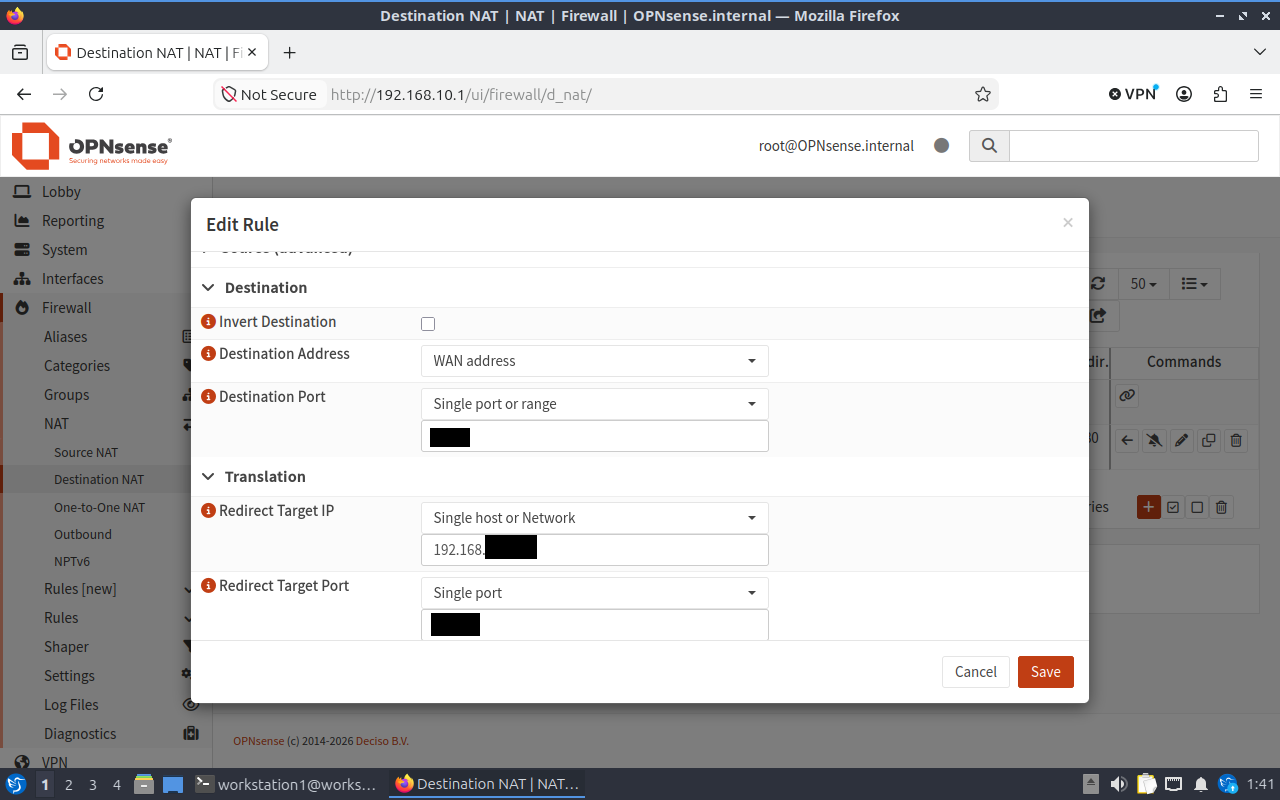 With our port forwarding configured, devices on the internet should now able to reach the server VM. I can confirm this by entering my public WAN IP into a web browser on my host machine:
DNS and HTTPS
Now it's time to acquire a domain name from a registrar and map our IP address to it. I already have a domain name (the website you are currently viewing this web page on, jlprojectportfolio.com) and would like to avoid having to pay for another one just for this project alone. I can avoid this by creating a new wildcard SSL certificate for my domain and an additional subdomain that I will use for my web application.
First, I'll connect to my EC2 instance via SSH and navigate to the directory of my NGINX config folder for my portfolio website.
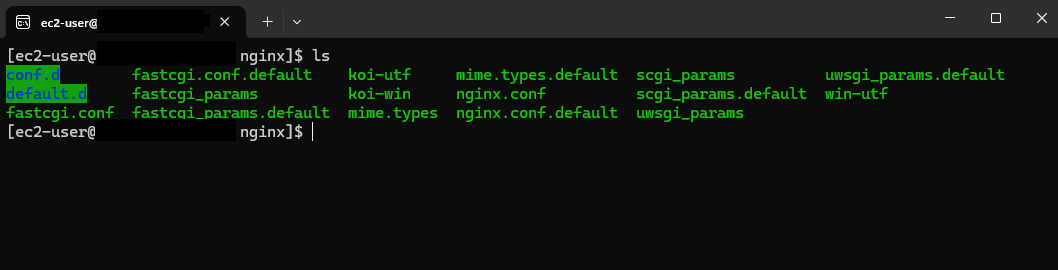 The folder called "conf.d" is used to store individual NGINX configuration files. I'll create two new ".conf" files, one for the portfolio website and one for the web application.
portfolio.conf
            # Configuration file for the portfolio website
            server {

                if ($host = jlprojectportfolio.com) {
                    return 301 https://$host$request_uri;
                }

                listen       80;
                listen       [::]:80;
                server_name  jlprojectportfolio.com;
                root         /usr/share/nginx/html;

                error_page 404 /404.html;
                location = /404.html {
                }

                error_page 500 502 503 504 /50x.html;
                location = /50x.html {
                }
            }

            # Settings for TLS enabled server.
                server {
                    listen       443 ssl;
                    listen       [::]:443 ssl;
                    http2        on;
                    server_name  jlprojectportfolio.com;
                    root         /usr/share/nginx/html;

                    ssl_certificate /path/to/cert/fullchain.pem; # managed by Certbot
                    ssl_certificate_key /path/to/cert/privkey.pem; # managed by Certbot

                    error_page 404 /404.html;
                    location = /404.html {
                    }

                    error_page 500 502 503 504 /50x.html;
                    location = /50x.html {
                    }

                }
cs2webapp.conf
            # Configuration file for the cs2 price tracker website
            server {

                if ($host = app.jlprojectportfolio.com) {
                    return 301 https://$host$request_uri;
                }

                listen       80;
                listen       [::]:80;
                server_name  app.jlprojectportfolio.com;

                # Route to server
                location / {
                    proxy_pass http://myserveraddress/;
                    proxy_set_header Host $host;
                    proxy_set_header X-Real-IP $remote_addr;
                    proxy_set_header X-Forwarded-For $proxy_add_x_forwarded_for;
                    proxy_set_header X-Forwarded-Proto $scheme;
                }
            }

        # Settings for a TLS enabled server.
            server {
                listen       443 ssl;
                listen       [::]:443 ssl;
                http2        on;
                server_name  app.jlprojectportfolio.com;
                root         /usr/share/nginx/html;

                ssl_certificate /path/to/cert/fullchain.pem; # managed by Certbot
                ssl_certificate_key /path/to/cert/privkey.pem; # managed by Certbot
                ssl_session_cache shared:SSL:1m;
                ssl_session_timeout  10m;
                ssl_ciphers PROFILE=SYSTEM;
                ssl_prefer_server_ciphers on;

                # Route to server
                location / {
                    proxy_pass http://myserveraddress/;
                    proxy_set_header Host $host;
                    proxy_set_header X-Real-IP $remote_addr;
                    proxy_set_header X-Forwarded-For $proxy_add_x_forwarded_for;
                    proxy_set_header X-Forwarded-Proto $scheme;
                }
            }
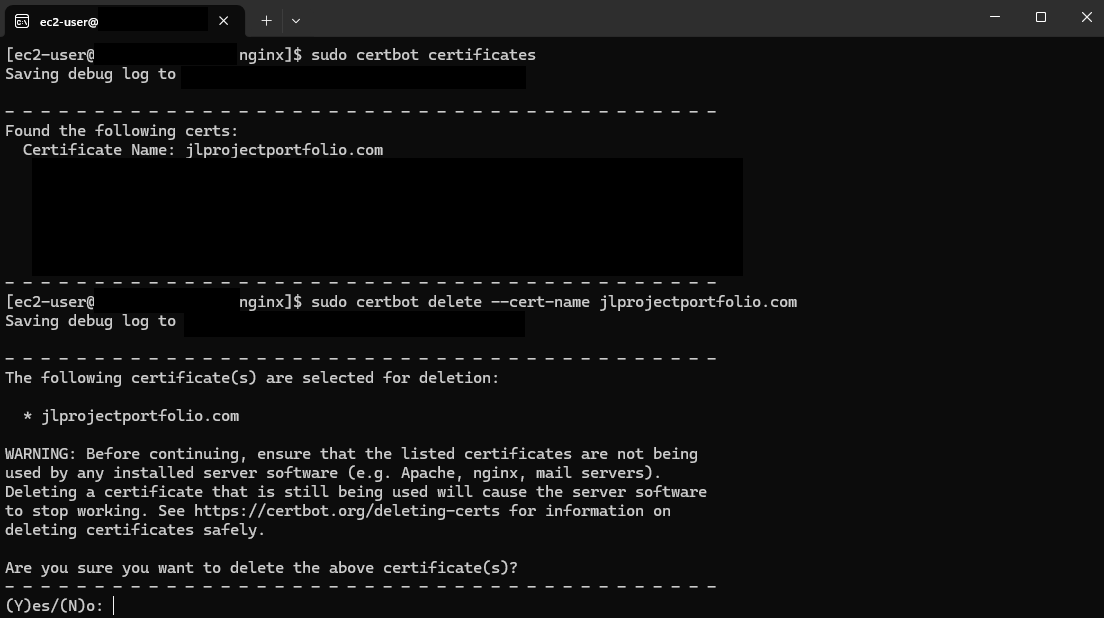 Then, replace the existing one with a new wildcard certificate:

Certbot will need to verify that I am the owner of my domain. It'll output an authentication string that will need to be added as a TXT record with a name that starts with "_acme-challenge...." to my DNS service. In my case, Let's Encrypt/Certbot will skip this process because I already did it the first time I deployed the web application.
Here is an example of the TXT record that would need to be added to my DNS service provider, AWS Route 53: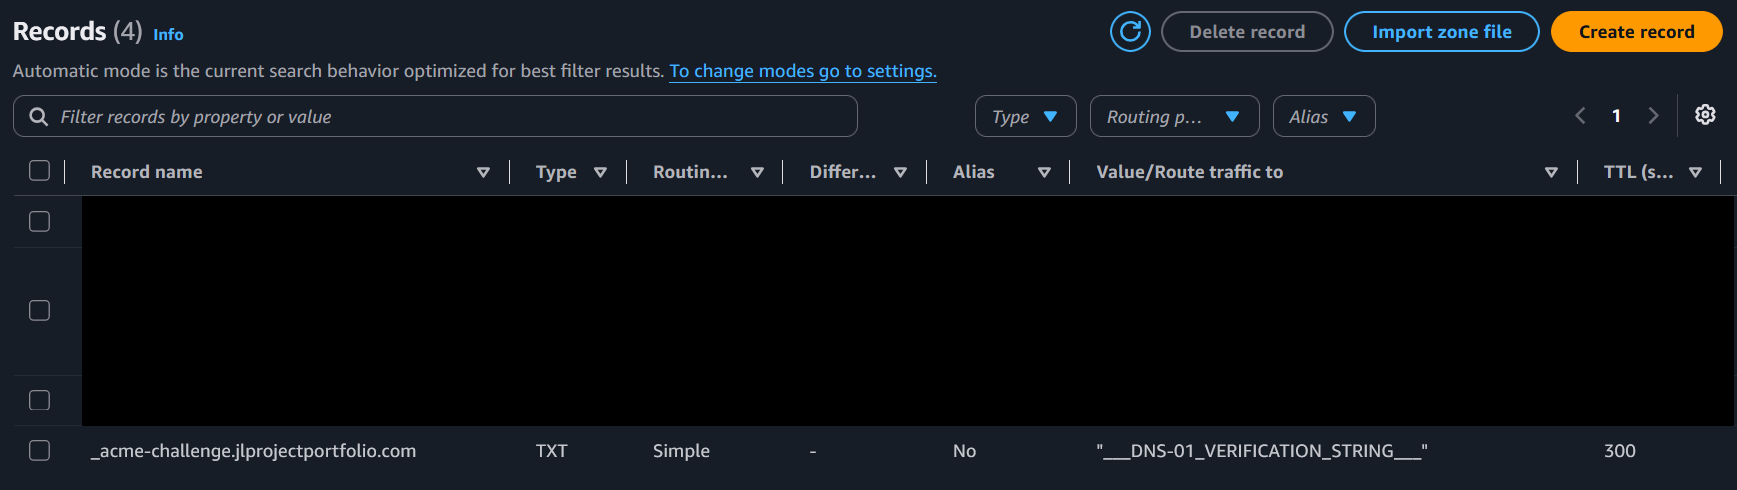 Then I'd switch back to the EC2 instance console window and initiate the challenge. Certbot uses that TXT record to confirm that I do indeed own that domain and issues a new wildcard certificate.
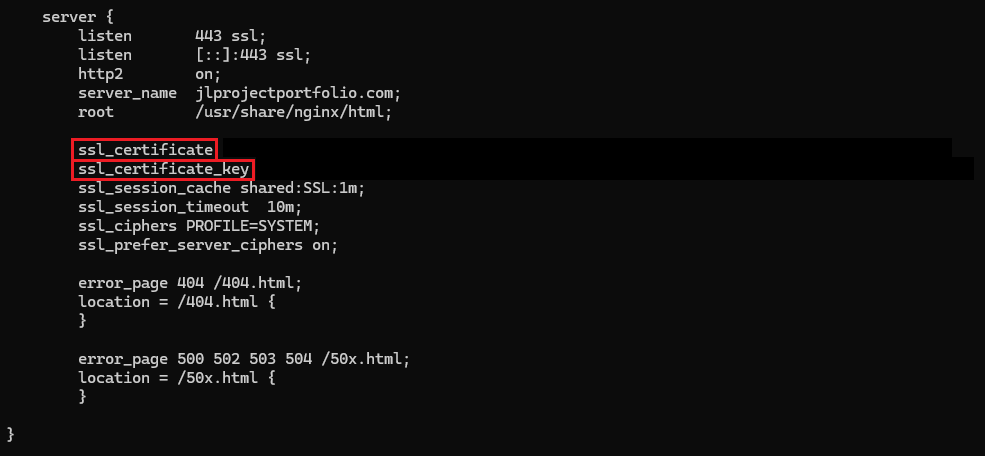
 Our SSL certificate paths need to be updated in our NGINX config files to where Certbot stored our new certificate:
 Test the NGINX config files and reload NGINX service if the test passes
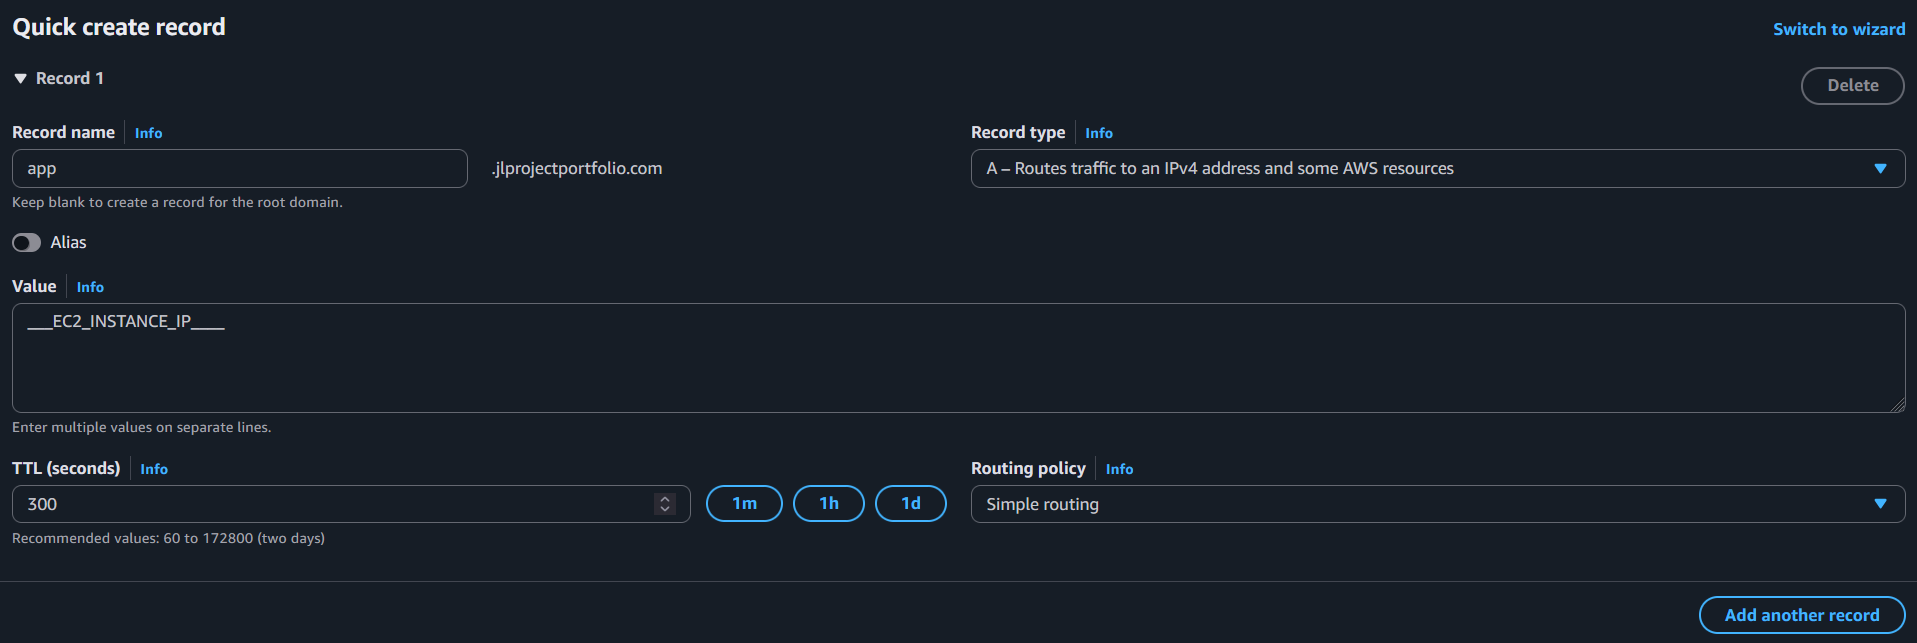
 Add DNS 'A' record for the subdomain:
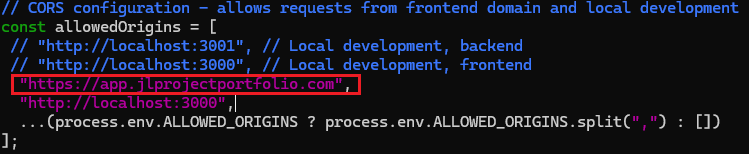
 One last quick change to the CORS configuration of the server.js file so our backend accepts requests from our domain.

 After Route 53 propagates our DNS changes to its authoritative DNS servers, the web application should now be accessible from the internet!
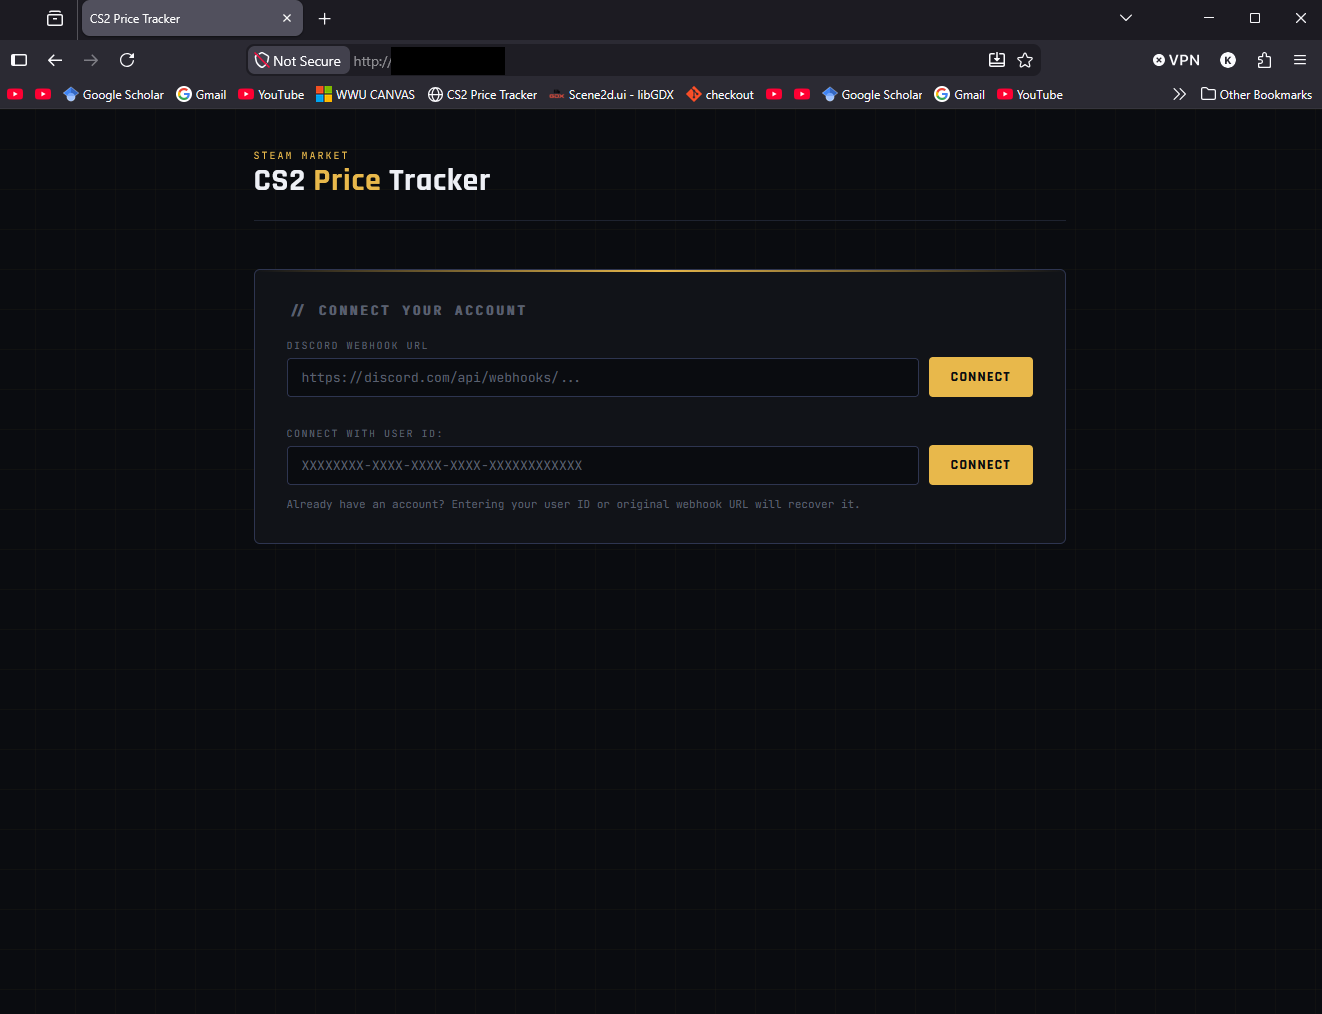
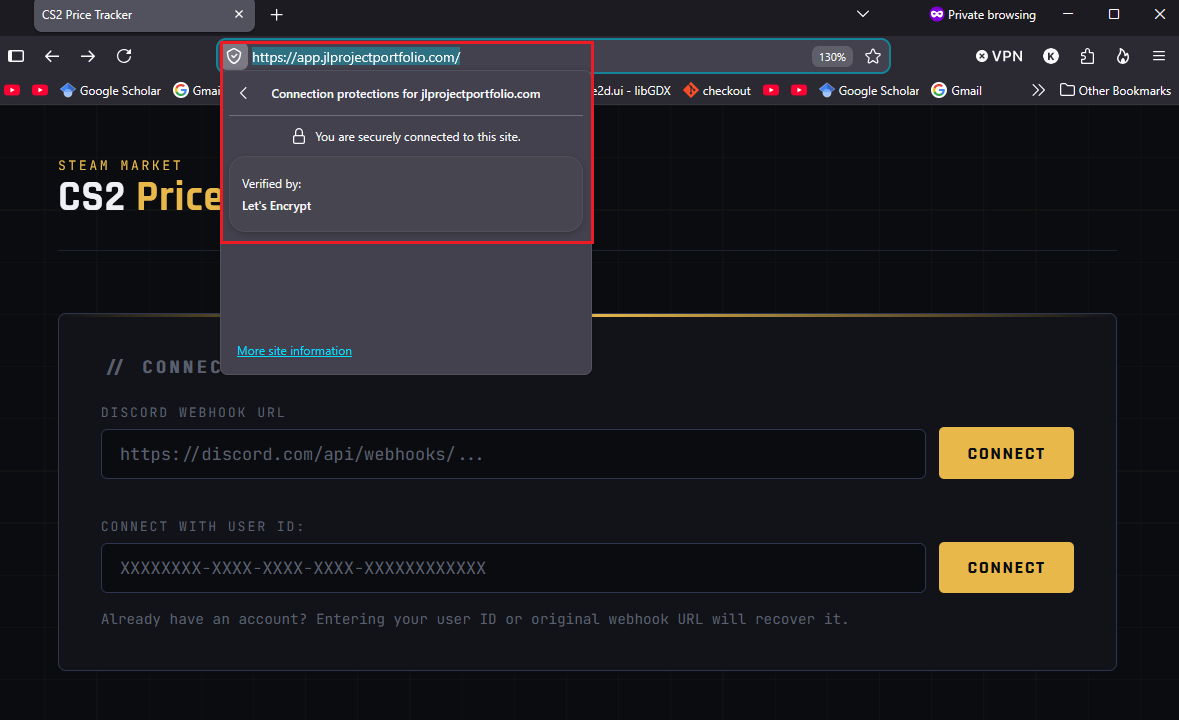 Typing in the URL for the website (app.jlprojectportfolio.com) leads to the expected landing page of the web application. We can also see that the connection is secure and that our SSL certificate is working correctly.
Conclusion
Now my web application is live and accessible to other devices on the internet! To recap, I have done the following:
- Split an open-source application into two containers (frontend/backend services) with Docker Compose
- Hosted the application on a server in a DMZ subnet behind an OPNSense router with firewall rules that secure the network and isolate server traffic from the rest of the network.
- Changed the NGINX configuration on my EC2 instance so that it serves the static content of my web portfolio and acts as a reverse proxy that redirects the appropriate web traffic to the web server behind my home network.
This surprisingly doesn't cover everything I've done on this project. The original author of the application only wrote backend code (MongoDB, API), the code for the frontend was actually written by me. If you'd like to see more, here is the link to my Github repository: here